Beginner’s Guide to Installing Node.js on a Raspberry Pi
This article has been updated to cover the installation of the latest version of Node at the time of this writing which is Node 9.x.
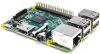
In this installment of our LTM (Learning through Making) series of Node.js tutorials, we’re going to get Node up and running on a Raspberry Pi 3 or Pi 2. With the Raspberry Pi 3, you won’t need to buy a separate USB Wi-Fi adapter. I’m focusing on the Raspberry Pi 3/Pi 2 rather than older versions such as the Raspberry Pi B+ since these are the latest models at the time of this writing. The Raspberry Pi 3, for example, sports a 1.2 GHz quad-core ARMv8 chip with 1 GB of RAM versus the Raspberry Pi 1 Model B+’s 700 MHz single-core ARMv6 chip with 512 MB RAM.
The instructions provided here are for installing Node.js on a Pi 3 (ARMv8) or Pi 2 (ARMv7) rather than other models based on the ARMv6 chip such as the Raspberry Pi 1 Model B, Raspberry Pi Model B+ or the Raspberry Pi Zero. A majority of this installation guide should still prove useful for other Raspberry Pi systems besides the Pi 3 and Pi 2; however, the final steps focused on the installation of Node.js will not work for these systems based on the older ARMv6 architecture.
If you are interested in creating a slimmed down Raspberry Pi system without a graphical user interface, see my article on creating a lightweight Raspberry Pi with Raspbian Lite.
This tutorial is useful for anyone wishing to successfully install a Raspberry Pi 3/Pi 2 system, even if they are not interested in Node.js since the Node.js installation happens in the final steps of the tutorial. But, why would you not want to install Node.js?  Let’s get started!
Let’s get started!Table of Contents
 Hardware Needed
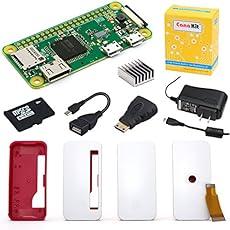
If you don’t currently own a Raspberry Pi, the easiest way to get started is to buy a starter kit such as this one on Amazon:
- CanaKit Raspberry Pi 3 Complete Starter Kit – 32 GB Edition (Note: my affiliate info is included on Amazon links so you can, if you desire, support these tutorials while paying nothing extra.)
We’ll need the following items to get rolling:
- Raspberry Pi 3 Model B or Pi 2 Model B (these are the official names for the Raspberry Pi 3 and Pi 2. Don’t let the “B” confuse you since there is also an older Raspberry Pi Model B which is now effectively the “Raspberry Pi 1 Model B”.)
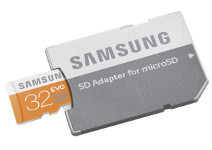
- MicroSD card (I recommend a class 10 card that is 16 GB or higher. I like this Samsung 32GB EVO Plus Class 10 Card
.)
- MicroSD to SD memory card adapter (so you can use the SD card reader on your laptop/desktop to write to the microSD card. Many microSD card vendors include this SD adapter with the purchase as shown here.)
- Micro USB power supply (2.5A or greater recommended) to power the RasPi.
- (RasPi 2 only) USB WiFi adapter (or Ethernet cable if preferred. I have tested this Edimax USB WiFi adapter on Raspbian and it works great out of the box. There’s a reason this is a best seller on Amazon.) This is not needed for the RasPi 3 since it includes built-in Wi-Fi.
- Windows laptop/desktop (Linux or Mac works great too, but this tutorial is geared more toward Windows machines so some readers will need to adapt)
- HDMI monitor/USB keyboard/mouse (You can borrow these from another system temporarily and then run your RasPi in a headless mode as I will explain later.)
Once you have gathered the needed hardware, we are ready to bring our RasPi machine to life!
Write Raspbian Image to SD Card
We will be running Raspbian which is a free operating system based on Debian Linux and optimized for the RasPi. Here we go:
- Download the latest Raspbian image from https://www.raspberrypi.org/downloads/raspbian/. Be sure to download the full version rather than the “lite” version. The download is a zip file that is about 1.5 GB so it may take some time to download depending on the speed of your Internet connection.
- Insert the microSD card into the SD adapter as shown in the Samsung sample picture above.
- Insert the SD adapter in the SD card reader on your laptop/desktop. Make sure it is seated well in the connection.
- Launch Windows Explorer and verify that the SD card registers as a drive on your system. Make a note of the drive letter as you will need it soon.
- Download and install Etcher. Etcher is a cross-platform (Windows, OS X, Linux) tool for flashing images to SD cards. It has many nice features including a simple user interface, the ability to flash an image without unzipping the zip file, and a validation step to verify the SD card image was written correctly to the SD card.
- (As an alternative for Windows users, you can use Win32 Disk Imager since it also provides the ability to read an SD card and create an image file which is handy for creating snapshots of Raspberry Pi systems that can flashed back to an SD card later if needed. For Win32 Disk Imager, you will need to first unzip the downloaded zip file before burning the .img file to the appropriate drive letter containing your SD card.)
- Launch Etcher. Be patient as Etcher takes a number of seconds to launch. When launched, the interface will look something like this:
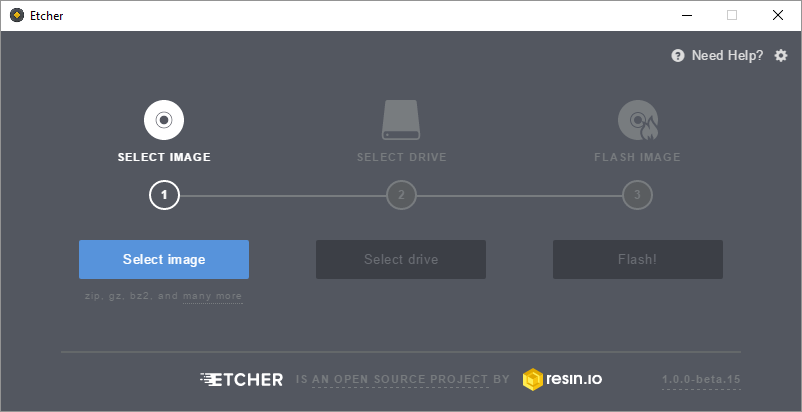
- Click the Select image button and navigate to the Raspbian zip file that you downloaded. (It does NOT need to be unzipped before flashing.)
- Click the Select drive button to specify the target device location of the SD card.
WARNING: Be sure you choose the right target device or you will write the image to another drive on your system and this will not be good. - Click the Flash! button to write the image to your SD card.
- If you are running Windows, you may be presented with a security prompt regarding making changes to your device. If so, click Yes to proceed.
- After the image is written to the SD card and verified, Etcher will automatically dismount your SD card so it can be safely removed.
- Remove the SD adapter from your laptop/desktop, and remove the microSD card from the SD adapter.
Prep the Hardware
The Tech Brick Café has a nice overview picture of the various parts of the RasPi 2 here (RasPi 3 looks very similar) that may help you in this section. Let’s get this little SBC (single board computer) ready to boot! Here are the steps:
- Insert the microSD card into the RasPi. (Turn the RasPi upside down. The microSD card slot is located on the side opposite of the USB ports. This short video explains the process well.)
- Connect the USB keyboard and mouse
- Connect the HDMI cable
- Connect the USB Wi-Fi adapter (or Ethernet connection if you are not using Wi-Fi) This step is not necessary if you are using a Raspberry Pi 3 which has on-board Wi-Fi.
- Connect the power supply (You will see the RasPi lights come on and power up.)
- You should now see Raspbian booting on the screen. Hooray!
My Amazon Picks


Configure the RasPi
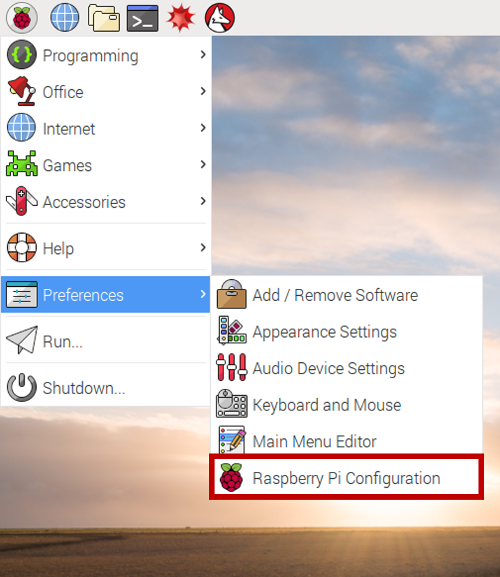
We first need to make a few changes to the RasPi to for the purpose of optimization and personalizing it for our use. To get started, launch Raspberry Pi Configuration which is located in the Menu under Preferences.
This will launch the Raspberry Pi Configuration utility, a handy graphical version of the console-based raspi-config program that was used for many years to configure the RasPi (and is actually still used behind the scenes by this graphical version). This will launch the following window:

Let’s start configuring!
This will launch the Raspberry Pi Configuration utility, a handy graphical version of the console-based raspi-config program that was used for many years to configure the RasPi (and is actually still used behind the scenes by this graphical version). This will launch the following window:
Let’s start configuring!
- (Optional) Change Password – from a security perspective, it’s a good idea to change the default password for the “pi” user. Just make sure you don’t forget it.

- Hostname – if you prefer less typing when connecting remotely (explained later), you can change the host name from “raspberrypi” to something shorter such as “raspi”.
Localization
The Raspberry Pi is the brilliant brainchild from our friends in the UK. If you are not from the UK, you will need to change some of the localization settings. For example, some of the keys on your keyboard may not work as expected. Here are the changes I made to make my RasPi feel at home in San Diego:
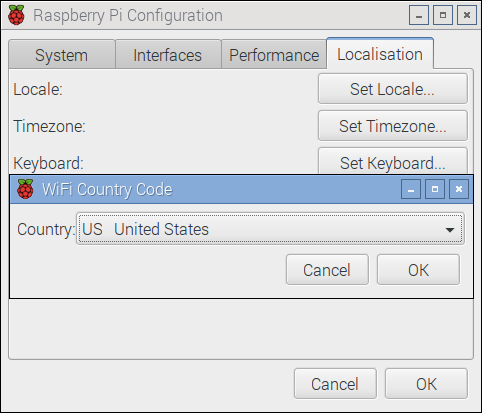
First, click on the Localisation tab:

Click the Set Locale button to change your locale as appropriate and then click OK. Mine looks like this after making the changes:

Click the Set Timezone button to set your timezone and then click OK.

Click the Set Keyboard button to set your keyboard as appropriate and then click OK. Here’s mine:

Finally, click the Set WiFi Country button and change as needed. This dialog box presents a large list of countries. Use the arrow keys on your keyboard to scroll through the list to find your country and then click OK.
After completing these configuration steps, click OK to exit the Raspberry Pi Configurationprogram. The RasPi will then let you know that it needs to reboot to activate the changes you just made. Reboot it now.
Click the Set Locale button to change your locale as appropriate and then click OK. Mine looks like this after making the changes:
Click the Set Timezone button to set your timezone and then click OK.
Click the Set Keyboard button to set your keyboard as appropriate and then click OK. Here’s mine:
Finally, click the Set WiFi Country button and change as needed. This dialog box presents a large list of countries. Use the arrow keys on your keyboard to scroll through the list to find your country and then click OK.
After completing these configuration steps, click OK to exit the Raspberry Pi Configurationprogram. The RasPi will then let you know that it needs to reboot to activate the changes you just made. Reboot it now.
Configure Wi-Fi
After the RasPi reboots, we are ready to get Wi-Fi up and running to get on the network.
- Click on the network icon in the top right of the screen as shown in the screenshot. The network icon will look different than the icon in the screenshot before Wi-Fi is configured; however, it will should be located between the Bluetooth icon and the speaker (volume control) icon.

- After clicking the network icon, select your network SSID (Wi-Fi network). If you don’t see your Wi-Fi network, be patient. You may see a “Scanning APs” message in the menu; however, your Wi-Fi network SSID should eventually appear in the menu after it is located. When your network SSID appears, click on it.
- You will be prompted for your pre shared key (Wi-Fi) network password. Enter it and select OK.
- Wait for the icon to transform from a network icon to the Wi-Fi icon shown in the screenshot above. From this point, you should be connected to your Wi-Fi network.
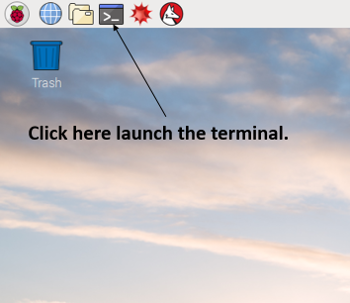
- Test your Wi-Fi network connection by launching the terminal.
- From the terminal, issue a ping command to verify your network connection is working:
- $ ping google.com
We’re now ready to move on and ensure our system is up to date with security patches
Apply Raspbian Updates
We will first run the apt “update” command. This command will not actually update any software on the system, but will download the latest package lists from the software repositories so that Raspbian will be aware of all new software available along with dependencies. Issue the following command at the “$” prompt:
- $ sudo apt update
Next, run the following command to upgrade any packages installed on your system that need upgrades:
- $ sudo apt full-upgrade -y
This is important to keep your RasPi system synchronized with security updates, etc. These two commands should be issued together and run periodically.
Prepare Remote Desktop
We want to run our RasPi remotely without requiring a dedicated HDMI monitor and USB keyboard/mouse. This is known as headless mode. We will be using the xrdp package to accomplish this goal. Newer versions of Raspbian (starting with versions that ship with the PIXEL desktop environment) ship with RealVNC for remote connections. Unfortunately, RealVNC does not work well in headless mode since it degrades to a very low resolution, and there is quite a bit of ceremony required to change the resolution. The xrdp solution automatically scales our desktop resolution and makes our life much easier. Let’s do it:
- Before we can install xrdp, we must first install the tightvncserver package. The tightvncserver installation will also remove the RealVNC server software that ships with newer versions of Raspbian since tightvncserver (xrdp) will not work if RealVNC is installed. (Thanks to Ryan Hanley for this tip!) Enter the following command in the terminal:
- $ sudo apt install -y tightvncserver
The “-y” option will automatically answer yes to the default questions which is what we want in this context. - Next, invoke the following command to install xrdp:
- $ sudo apt install -y xrdp
- Finally, we need to install the samba package so we will be able to access the RasPi by its host name from Windows machines on the network rather than by its IP address which can change since the RasPi receives its IP address via DHCP. (For OS X users, you can install Bonjour and then access your Raspberry Pi by host name. For example, if your host name is “raspi”, you can access it on OS X as “raspi.local”.) OK, let’s install Samba:
- $ sudo apt install -y samba
- After this installation completes, you should be able to ping the RasPi Hostname (configured in Raspberry Pi Configuration program above) from a Windows machine:
- C:\> ping raspi
- You are now ready to launch a remote desktop connection!
- From your Windows machine, hit the Windows key, and type “Remote Desktop Connection” to bring up the Remote Desktop program. Click it in to invoke it. (OS X users can use Microsoft Remote Desktop which is available for free in the Mac App Store.)
- Type the host name of your RasPi (“raspi” in my case) in the Computer textbox.

- Next, click the Display tab. Move the Display configuration slider all the way to the right to “Full Screen” to ensure our remote desktop connection will fill our screen. It may already be set to “Full Screen”.

- Click the Connect button near the bottom of the dialog box.
- You will then be prompted with the xrdp login screen:
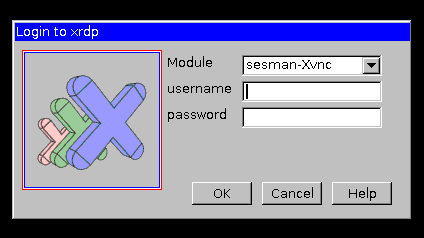
- Enter your credentials and log into the RasPi.
- username: pi
- password: raspberry (unless you changed it in the Raspberry Pi Configurationprogram earlier in the tutorial.)
Amazing! We are connected remotely to the RasPi and we no longer need the dedicated HDMI monitor and USB keyboard/mouse. Let’s go ahead and shut down the RasPi for a minute so we can free up our monitor and keyboard/mouse:
- Launch a terminal session and enter the following command to cleanly shut down your system:
- $ sudo poweroff
- Wait a minute for the RasPi to fully power down.
- Unplug the power cable, HDMI cable, and the USB keyboard and mouse.
- Plug the power cable back in and the RasPi should be on its way back up without all of those extra cables!
- After giving the RasPi a minute or so to boot, connect to it once again using the Windows Remote Desktop program.
Create Windows File Share on the RasPi (Optional)
We can create a Windows file share on the RasPi so that we can copy files from our Windows machine directly onto the RasPi. This can come in handy in many contexts. This is also useful for OS X users since you will be able to connect to your Raspberry Pi file share from Finder under “Shared”. Here’s how we do it:
- Launch a terminal session.
- Issue the following command to launch the Leafpad editor.
- $ gksudo leafpad /etc/samba/smb.conf &
- Note that we are using gksudo instead of sudo. For the technically curious, this is to get around a configuration issue in Raspbian where there is not a .Xauthority credential file in the /root folder. The gksudo command is used to launch GUI programs as the root user.
- You may be prompted with a message that indicates you have been “Granted permissions without asking for a password”. To avoid seeing this message in the future, you can select the checkbox to “Do not display this message again”.
- We could have also used the console-based “nano” editor, but Leafpad provides a GUI which is more suitable for beginners. The ampersand on the end of the command launches Leafpad as a background process so we are returned to a shell prompt in the terminal. Also, the smb.conf is part of the Samba package we installed early and this is why it exists on our system.
- Scroll down to the very bottom of the smb.conf configuration file and add the following:
- [PiShare]
- comment=Raspi Share
- path=/home/pi
- browseable=Yes
- writeable=Yes
- only guest=No
- create mask=0740
- directory mask=0750
- public=no
- Save the changes to the smb.conf configuration file and exit the Leafpad editor. (Raspbian will automagically restart the SMB (Samba) services based on the changes you made to the configuration file.)
- Back in a terminal session, we need to create an SMB (Samba) user so we can connect securely from Windows. We will create a user named “pi”, but this will be an SMB (Windows user) rather than the Raspbian “pi” user. Here’s how we do it:
- $ sudo smbpasswd -a pi
You will be prompted to enter and re-enter a password. Document this password somewhere for future reference.
We are ready to connect to our newly created RasPi file share from Windows!
- Back on your Windows machine, type the Windows key and “R” (Win-R) to launch a run box for typing in commands.
- Enter two backslashes followed by the name of your RasPi machine (i.e. your Hostname) and hit enter. For example:
- \\raspi
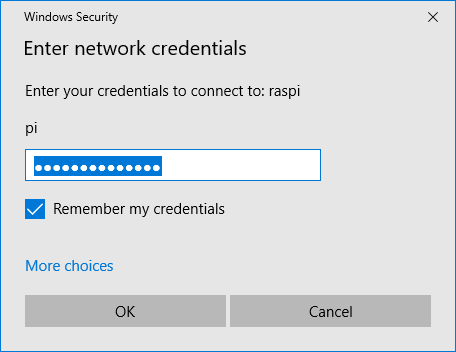
- When prompted for credentials, enter the following:
- Username: The format to enter here in Windows parlance is the domain\username. For us, our domain will be our RasPi hostname and our user name will be “pi”. Therefore, we will enter: raspi\pi
If your Hostname is not raspi, you will obviously enter that instead. - Password: (enter the password you created with the smbpasswd command above)
- Username: The format to enter here in Windows parlance is the domain\username. For us, our domain will be our RasPi hostname and our user name will be “pi”. Therefore, we will enter: raspi\pi
- Voilà! We should now be connected. Double click the PiShare folder to launch the file share you just created. You will also see a folder called pi that provides read-only access to your entire home directory.
- You can test your newly created file share by creating a text file on the Windows side and verifying that it shows up in the /home/pi directory on the RasPi side.
- In Windows, you can also map a drive to the file share you just created as follows:
- Launch Windows Explorer.
- Click on the Map network drive button in the ribbon menu at the top and select Map network drive.
- Enter the drive letter (for example “P” for “pi” drive), the share folder path, and select Reconnect at sign-in:
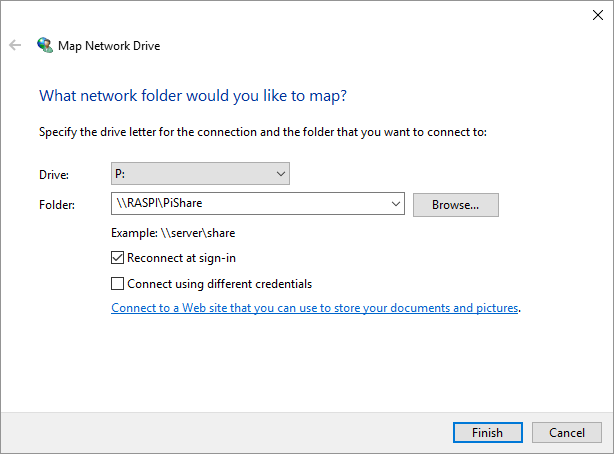
- Enter the password you created with the smbpasswd command above (if prompted) and select Remember my credentials:
- You should now see a “P” drive (or other drive letter you selected) when viewing through Windows Explorer!
Install Node.js
You now have an amazing general purpose Raspberry Pi system that can be used for a variety of tasks and inter-operates well in the Windows world (it even looks like a Windows machine to the other Windows machines!) – and can play nicely in the Mac and Linux world too. Let’s go ahead and install Node.js so we will be ready to do some fun projects in the future. Here are the steps:
Our friends at NodeSource host and maintain some excellent Node.js binary distributions. We will leverage a command they have written to add another package repository to our RasPi so that we will be able to “apt install” a modern version of Node.js from their repository. This is beneficial since the Debian/Raspbian versions may not always be up to date. By adding the NodeSource repository, we will also be able to receive updates rather than just installing a standalone (.deb) file version of Node that cannot be updated easily.
Note: As described at the beginning of this article, this final section of the tutorial related to the installation of Node.js requires a Pi system based on the newer ARMv7 or ARMv8 chip such as the Pi 2 or Pi 3. NodeSource provides Node.js binaries for these newer ARMv7+ architectures, but not for Raspberry Pi systems based on the older ARMv6 architecture such as the Raspberry Pi Model B/B+ or the Raspberry Pi Zero.Read the writing carefully on your Raspberry Pi circuit board to confirm is says something like “Raspberry Pi 3 Model B” or “Raspberry Pi 2 Model B”. If in doubt, run the following command in the terminal:
- $ uname -m
If the result returned starts with “armv6”, you are running a Raspberry Pi based on the older ARMv6 chipset and the next Node.js installation step will not work; otherwise, you are ready for the next step.
Here we go in the final stretch! Let’s proceed with an installation of the latest version of Node at the moment which is Node 9.8.0.
- $ curl -sL https://deb.nodesource.com/setup_9.x | sudo -E bash -
The previous command updates our Debian apt package repository to include the NodeSource packages.
Note: It’s generally a good idea from a security perspective to know what commands you are invoking on your system, especially since the command above invokes the script as the root user. If you want the technical details behind this script, you can launch the URL (https://deb.nodesource.com/setup_8.x) in your browser and review the code. The script carries out some ceremony to determine the Linux distribution you are running and instructs the Debian apt package system to add the NodeSource package repository as a trusted source for obtaining Debian packages. This enables us to install Node.js now and upgrade to more recent versions of Node.js when they become available.
Now that we have added the NodeSource package repository, we can move on and install Node.js!
- $ sudo apt install -y nodejs
We can then test and see what version of Node we are running and launch the Node REPL as we discussed in the previous article as a quick test to confirm the installation was successful.
- $ node -v
- v9.8.0
- $ node
- > 1 + 3
- 4
- > # We can hit Ctrl-C twice to exit the REPL and get back to the bash (shell) prompt.
Next Time
In a future post, we will leverage the goodness of the npm (Node Package Manager) community and build a simple, but highly functional Web server without any code. This can be accomplished using the Raspberry Pi system you just created here or on a Windows/Linux/Mac machine as I outlined in a previous article. Hope to see you then!
Follow @thisDaveJ (Dave Johnson) on Twitter to stay up to date on the latest tutorials and tech articles.
Related Articles
Create a Lightweight Raspberry Pi with Raspbian Lite
Learning through Making – Getting Started with Node.jsUpgrading to more recent versions of Node.js on the Raspberry Pi
Create a Web Server in Node without any CodeMake Your Raspberry Pi Web Server Available on the Internet with Node.js
Controlling a Raspberry Pi from a Mobile Device with Bonus Menu Too
留言
張貼留言